If you like making miniatures of the Civil War era or earlier, at some point you might have to rig a ship. Guess what? It’s easier than you think! In today’s Mewsing, we will show you simple ways to add rigging without losing your mind and with accuracy so that no matter how simplified, at least it’s correct!
When I (Rebecca) made our model of USS Housatonic, I was starting from scratch and had never even put together a kit of a ship. So when it came to the rigging, I thought, “Please tell me I don’t need all the rigging you see in [the movie] Master and Commander!” Spoiler alert: the answer is no, you don’t. And even with the simplified rigging that our Housatonic has, we had one visitor (who had experience on ships) comment with surprise that the rigging was correct, which he doesn’t always see on model ships.
To rig Housatonic, I looked on Google for diagrams of rigging, and learned all about standing rigging, running rigging, how to furl a sail, how to clew up a sail…. But don’t worry, we’re not going to cover that here. Our tips will be for beginners. When you want to go deeper into rigging, there are plenty of diagrams online, or model ship kits that will tell you how to rig it, or forums online to go really in-depth into tying rigging with the knots used on a ship (which is even beyond my interest at this point).
Let’s get started! We’ll introduce rigging in steps. If the thought of rigging scares you, just do Step 1 and leave it at that. It’s still better than bare masts! If you get to the end of it and think, “That wasn’t so bad!” go ahead and try Step 2.
Tip: I tie the rigging to the masts and spars, but if you don’t want to deal with trying to tie knots, you can just glue the string/thread in place.
Step 1: At the most basic level of rigging, your ship needs stays to keep the masts from falling over, either forward/backward or side-to-side. Use black string/thread because “standing rigging” (i.e. rigging that doesn’t move) is always black.
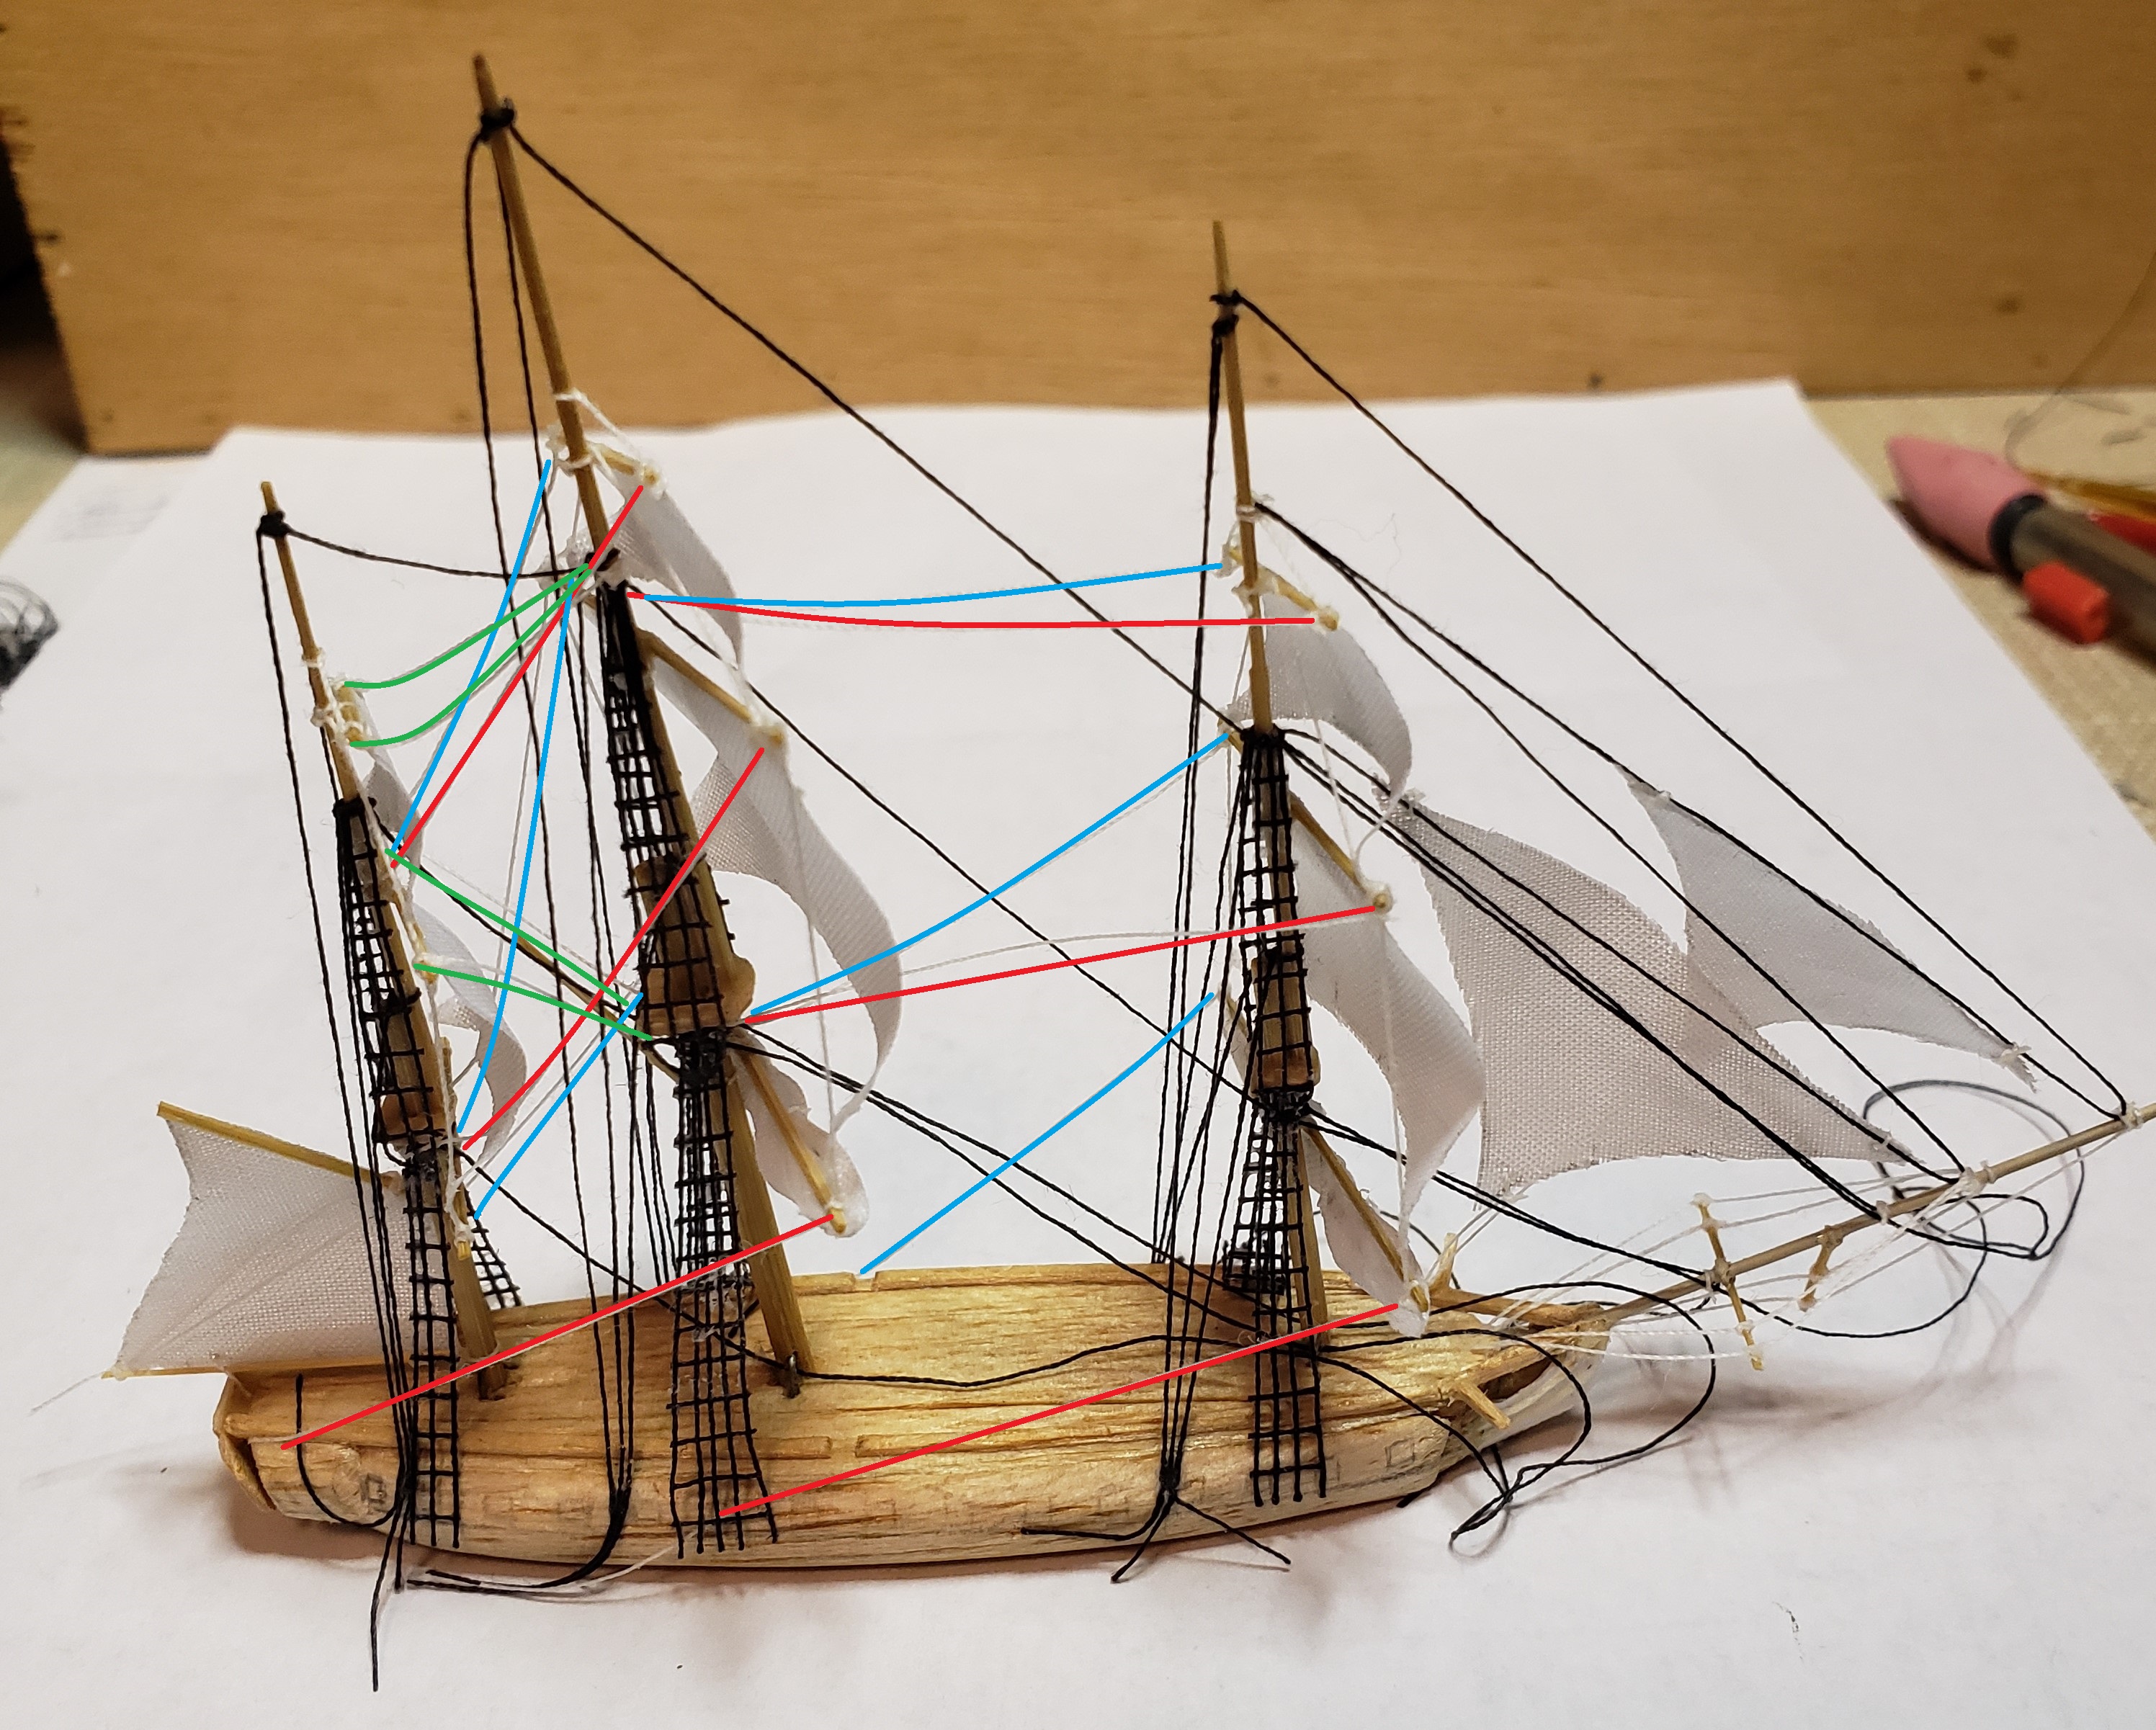
In this picture, the fore-and-aft stays are marked in red. As you can see, there are more of them on Housatonic, but I only marked the ones that I would consider essential to give the impression of rigging. You can see that on each mast, the rigging is the same. The lowest runs from the fighting top down to the deck. The next one up runs down to the fighting top of the mast in front of it. And so forth.

In the next photo, you can see the backstays that run to the sides of the ship, marked in blue. Note that they do not run from the fighting tops, however. For that, you need the shrouds, i.e. the ladder-like rigging (marked in green, in our picture). If you don’t want to tackle the grid-like rigging, I would suggest you at least run a couple strings to represent the shrouds, because otherwise it will look strange that your lower masts are unsupported side-to-side, but the upper masts are.

See? Now, that wasn’t hard, was it? Even for a beginner’s effort, you have a ship that has rigging, and the rigging is not random or a guess. Good job!
Ready for more? On to Step 2!
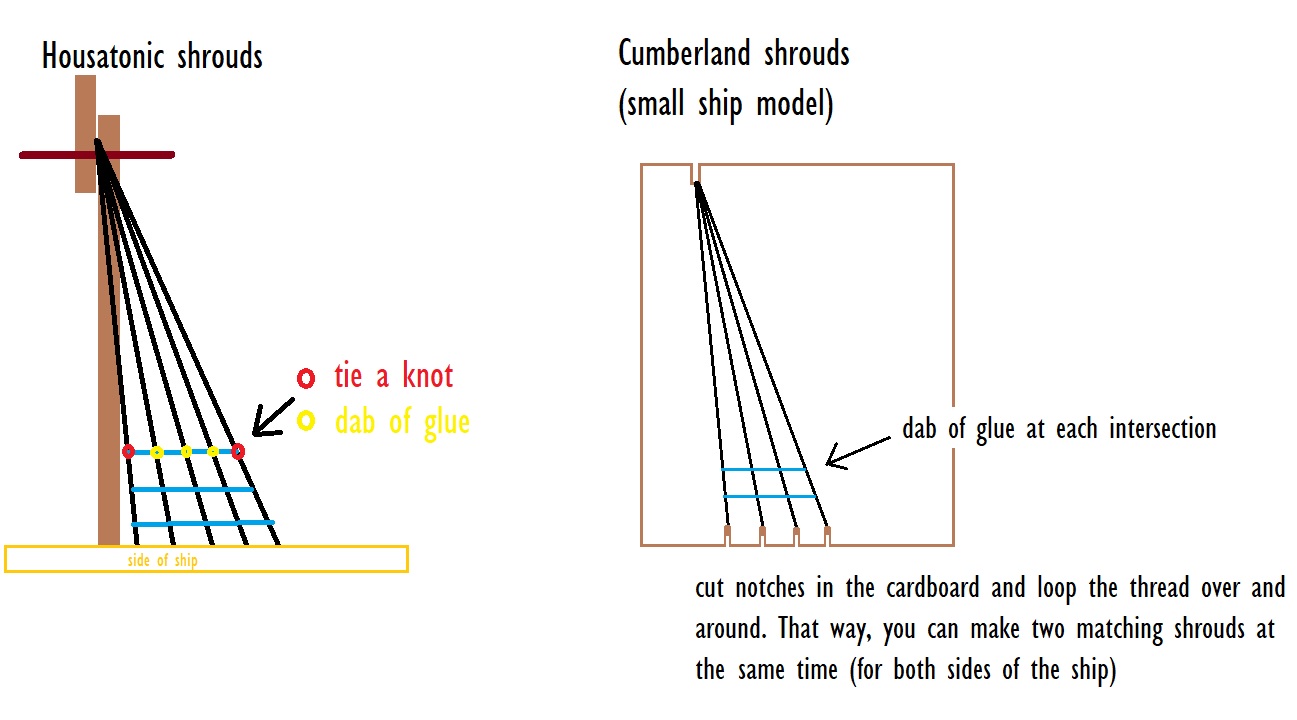
Step 2: This is probably the most difficult of our steps, but it should be done next. Shrouds, like stays, are black. To make them, glue (or tie) string/thread into a grid. Model ship kits usually come with a jig that makes this easier. With Housatonic, the ship is big enough that I just ran the vertical lines (shrouds) from mast to side, and then added the horizontal threads (ratlines), knotting them at each intersection. Or, you can just tie a knot at the beginning and the end, with dabs of glue at each crossing in between (see the diagram below).
With a small ship, such as our USS Cumberland ship-in-a-bottle, the shrouds are small enough to use only glue and not bother with knots. I used an old model ship kit jig, but you can make one with a piece of cardboard (just be careful that your shrouds don’t glue to the cardboard!).
To be correct, each section of each mast needs shrouds. You can see them in the photos above of Housatonic. On the upper shrouds, measure your fighting tops, etc. where the shrouds end so you can space the verticals correctly. You don’t want the base of your shrouds to be too wide!
Step 3: If you’re still reading this, you are either addicted or a glutton for punishment. On to the “running rigging” (i.e. the rigging that moves). Use white thread, because running rigging is natural, not black.
Braces are the running rigging that moves the spars to angle the sails. In the photo, the starboard (right) braces are red, the port (left) are blue. Note that on the mizzen mast, they run forward to the main mast (green lines), since there isn’t a mast behind the mizzen.
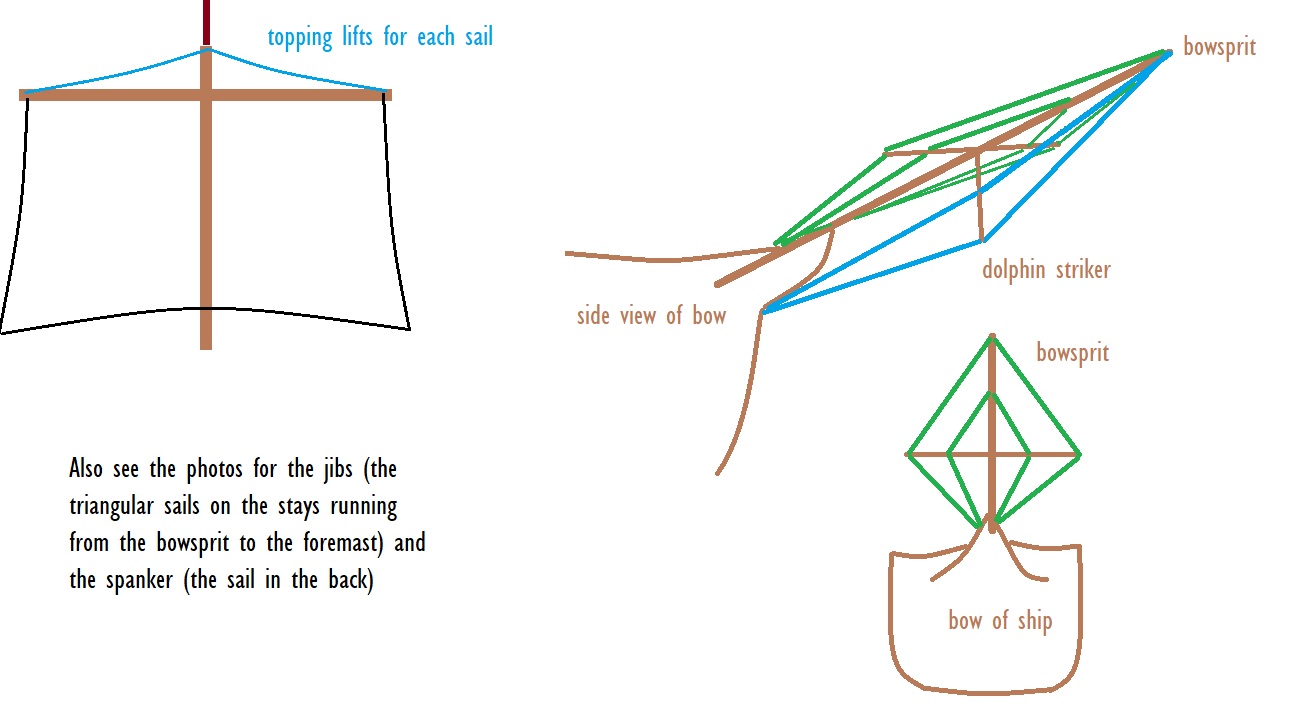
Step 4: There are a few more simple touches to add if you like. They’re a bit beyond our purview in this Mewsing, but you can see them in the photos above of Housatonic and Cumberland.
My usual mantra is, “If you feel yourself going crazy, back off on the detail or take a break.” But in this case, why not try pushing yourself? Give rigging a try!
